When I bought my house one of the things I fell in love with was the attic. It’s big with high ceilings, has the
smell of old attic wood, and gives a feeling of a dark, mysterious past. It’s the perfect environment for hosting
a Halloween party and years ago I decided to do exactly that.
Unfortunately, I didn’t take any pictures at the time, but I was fairly proud of what I threw together in a short
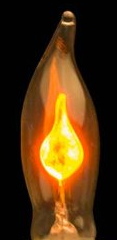
period and I’ll share some of it here. The centerpiece was a gothic chandelier eerily illuminated with neon gas
flicker bulbs. It caught everyone’s attention and did a nice job setting the mood. I always liked watching these
bulbs operate. Inside are two parallel electrode plates cut in the shape of a candle flame with a small gap in
between. The 120 volt power ionizes the gas between these plates, but a ballast resistor in the lamp base limits
the current so only a portion of the plates’ surface can produce a glowing discharge. The discharge heats the
ionized portion of gas, causing it to rise from convection inside the bulb, which gives the flickering appearance
as the discharge moves with the convecting ionized gas.
Beneath the chandelier was a refreshment bar to one side and Frankenstein’s workbench to another. The main
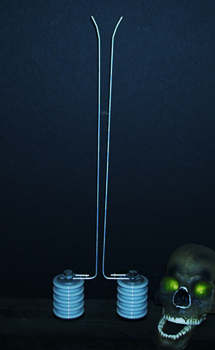
attraction on the workbench was my handmade Jacob’s ladder. Doctor Frankenstein used high voltage to bring his
creation to life so it was important to give that an exciting visual display. I made the electrode rods with
12-gauge suspended ceiling wire. It was important to bend the wire carefully so the vertical lengths stayed
straight and allowed the arc to climb smoothly. The mounting insulators were left over from a lightning
suppression job I had done earlier as an electrical contractor. There are plenty of less expensive materials
I could have used but I had these and it gave the project an authentic look. I also had an assortment of neon
tube transformers, which I had salvaged from renovation jobs in the past. The only one that produced satisfactory
results was rated at 15,000 volts a/c output. Fortunately these transformers are self-ballasting – meaning they
limit their output current to the operating value of standard neon tubing (~ 30 mA). This is important because
once the arc strikes between the electrodes it will allow unlimited current flow and would otherwise short out
the transformer. The gap at the bottom has to be the narrowest and is where the arc begins. It’s about ½” and the
electrodes spread to about 1” near the top, then flair to extinguish the arc so it restarts at the bottom. What
causes the arc to climb is the same convection process that occurs in the neon flicker bulbs. The high-voltage
ionizes the air, making it a conductive path. The current flow of the arc heats that ionized ‘cloud’ of air,
which causes it to rise like a hot air balloon. Because that ionized ‘cloud’ is the conductive path the arc rises
with it. When it reaches the top the spread of the electrodes exceeds the distance that the arc can be
maintained at 15,000 volts and it extinguishes, allowing the process to continuously repeat. This is a very
dangerous project! 15,000 volts is a very lethal level and continuous operation of the device produces ozone gas.
I took careful precautions by only operating it intermittently and behind a Plexiglas shield.
Because the attic is so large I was able to create a graveyard scene at one end. A kind of neglected and spooky
graveyard where spirits are free to wander. I spread dead leaves across the floor and made gravestones with
spray-painted styrofoam. I also rented a fog machine, illuminated the area with blacklight, and created a
lightning storm simulator.
I’ve always been fascinated with blacklight and decided to make my own illuminator. I chose to use a mercury
vapor lamp instead of fluorescent in order to get the light intensity I wanted, while also simulating moonlight.
Mercury vapor lamps aren’t as efficient as ‘BLB’ fluorescent tubes but they’re available in much higher
wattages, and you can control the light better because of the compact size of the arc tube. They’re used for
blacklight stage lighting for this reason, and also in Disney’s Haunted House attraction. I went with 175 watt
because I had the ballast from an old dusk-to-dawn fixture and it was also the right wattage for my application.
Like fluorescent lamps, mercury vapor also require a ballast transformer. The ballast unit incorporates a
transformer with an output of 225 to 255 volts (required to operate the arc tube) and a coil that limits the
lamp current by inductive reactance. I purchased a 175-watt reflector-type lamp to eliminate the need for
reflectors within the fixture. I drew the design of the fixture I wanted and had a friend of mine fabricate it
from sheet metal. (OK, I know I’m getting into a lot of work here but I love this kind of stuff!) My design
provided for a ventilation fan on one side and exhaust venting on the other. This is mostly to keep the filter
glass cool enough to prevent cracking. The fan was a shaded-pole C-frame unit that I salvaged from a very old
computer case.
Mercury vapor lamps produce much of their output in the visible range of the spectrum. As you can see from the
spectral image, there’s a lot of green and yellow. This was unwanted for my purpose and had to be filtered out.
An ideal filter would have been
Wood’s glass
, but since it’s expensive and hard to get I went with common
cobalt-blue plate glass. It filters the yellow and green and only allows the blue and blacklight bands to pass
through. Normally even the blue band would have been undesirable but in my case it gave a nice eerie moonlight
effect.
My final creation was a lightning storm simulator. By this time the party date was getting close and I had to
compromise quite a bit. I had to simulate a lightning flash shortly followed by the rumble of thunder, just like
in nature. The quickest solution for the lightning flash was a large xenon strobe light, set to the highest
flash rate. In nature the lightning bolts actually do ‘strobe’ with rapid, multiple discharges. Most of the
time though, it’s so rapid that the human eye perceives it as a single flash.
To coordinate the flash and thunder I used a cassette tape and player. A stereo cassette has two magnetic tracks
for the two stereo channels. On one track I recorded thunder from a thunderstorm CD I had. At each clap of
thunder I would stop the tape, rewind it a bit with a Bic pen, and then record a segment of white noise on the
other track. This noise segment was used to trigger a relay that fed power to the xenon strobe light. To convert
the noise from the cassette track to a binary on/off signal for the strobe relay I made a small two-transistor
amplifier circuit. It was biased to ‘off’ with a high-value resistor, had enough gain to signal fully ‘on’ from
the noise, and had enough impedance to be safely connected to my stereo output. From my stereo receiver I
connected the ‘thunder’ channel to a large 8-ohm speaker cabinet and the noise/trigger channel to my strobe
device. It wasn’t perfect but it worked well enough to give a cool effect and impress my friends.
I understand that all this may seem like too much work, but for someone who loves science and making things it
was probably more fun than the actual party. Everything went reasonably well and my creations functioned
properly throughout the night. There was only one mishap: One of my friends came dressed as a skeleton and
thought it would be cool to wander around in the graveyard scene. I didn’t expect anyone to be walking in this
area and had left some floorboards open from a wiring project I was working on. His foot found the opening and
his leg went through the ceiling underneath. Nobody was hurt but it scared the hell out of the people in that
room below… a good Halloween scare!
